HowVideo.works
How video works
Playback
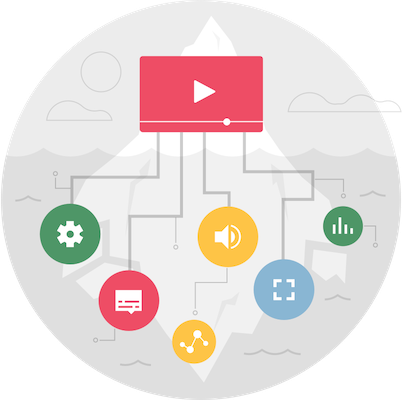
It might seem obvious, but there's a lot wrapped up in the word "playback"! The video player's UI is the first thing that most people associate with playback since it's what they see and interact with the most whenever they watch video on a site or platform. The icons and colors used in a player’s controls might be the most visible to the end-user, but that's just the tip of the playback iceberg.
The player controls or exposes other vital aspects of playback beyond just the controls themselves. Its functionality includes features like subtitles and captions, programmatic APIs for controlling playback, hooks for things like client-side analytics, ads, and much more.
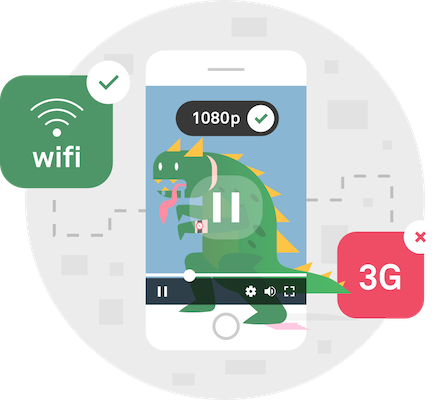
Perhaps most importantly, a modern video platform will use what's called adaptive bitrate streaming, which means they provide a few different versions of a video, also known as renditions, for the player to pick from. These different versions vary in display sizes (resolutions) and file sizes (bitrate), and the player selects the best version it thinks it can stream smoothly without needing to pause so it can load more of the video (buffering). Different players make different decisions around how and when to switch to the different versions, so the player can make a big difference in the viewer's experience!
You might remember watching videos on Netflix or Youtube and noticing that sometimes in the middle of the video the quality will get worse for a few minutes, and then suddenly it will get better. That is what you saw when the quality changes you are experiencing adaptive bitrate streaming. If you are doing any kind of video streaming over the internet your solution must support this feature, without it it's likely that a large number of your viewers will be unable to stream your content.
HLS
While the concept (and spec overall) can be intimidating, the basic concept behind HLS is surprisingly simple. Even though the term stands for "HTTP Live Streaming”, this technology has been adopted as the standard way to play video on demand. You take one big video file and break it up into small segments that can be anywhere from 2-12 seconds. So if you have a two-hour-long video, broken up into 10-second segments, you would have 720 segments.
Each segment is a file that ends with .ts. They are usually numbered sequentially so you get a directory that looks like this:
- segments/
- 00001.ts
- 00002.ts
- 00003.ts
- 00004.ts
The player will download and play each segment as the user is streaming. And the player will keep a buffer of segments in case it loses network connection later.
Now let’s take this simple HLS idea a step further. What we can do here is create the segment files at different renditions. Working off our example above, using a 2-hour long video with 10-second segments we can create:
- 720 segment files at 1080p
- 720 segment files at 720p
- 720 segment files at 360p
The directory structure might look something like this:
- segments/
- 1080p/
- 00001.ts
- 00002.ts
- 00003.ts
- 00004.ts
- 720p/
- 00001.ts
- 00002.ts
- 00003.ts
- 00004.ts
- 360p/
- 00001.ts
- 00002.ts
- 00003.ts
- 00004.ts
- 1080p/
Now, this starts to get cool, the player that is playing our HLS files can decide for itself which rendition it wants to consume. To do this, the player will try to estimate the amount of bandwidth available and then it will make its best guess as to which rendition it wants to download and show to you.
The coolest part is that if the amount of bandwidth available to the player changes then the player can adapt quickly, this is called adaptive bitrate streaming.
Manifest Files (a.k.a. Playlist Files)
Since the individual segment files are the actual content broken up into little pieces it is the job of the manifest files (aka playlist files) to tell the player where to find the segment files.
There are two different kinds of manifest files. For a single video there is one master manifest and multiple rendition manifests. The master manifest file is the first point of contact for the player. For an HTML player in the browser, the master manifest is what would get loaded as the src= attribute on the player. The master manifest will tell the player about each rendition. For example, it might say:
- I have a 1080p rendition that uses 2,300,000 bits per second of bandwidth. It’s using these particular codecs, and the relative path for that manifest file is "manifests/rendition_1.m3u8”.
- I have a 720p rendition that uses 1,700,000 bits per second of bandwidth. It’s using these particular codecs, and the relative path for that manifest file is "manifests/rendition_2.m3u8”.
- I have a 360p rendition that uses 900,000 bits per second of bandwidth. It’s using these particular codecs, and the relative path for that manifest file is "manifests/rendition_3.m3u8”.
When the player loads the master manifest it observes all the renditions that are available and picks the best one. To continue this example, let’s say our player picks the 1080p resolution because the player has enough bandwidth available. So now it’s time to load the rendition manifest ("manifests/rendition_1.m3u8")
The rendition manifest looks a lot different than the master. It is going to have some metadata and a link to every individual segment. Remember the segments from up above are the actual pieces of video content. In our example of a 2-hour long video broken up into 720 segments of 10 seconds each. The rendition_1.m3u8 manifest is going to have an ordered list of the 720 segment files. As one would expect, for a long video, this file can get quite large:
- segments/1080p/00001.ts
- segments/1080p/00002.ts
- segments/1080p/00003.ts
- segments/1080p/00004.ts
- segments/1080p/00005.ts
- ….etc for 720 segments
In summary, these are the steps the player goes through to play a video:
- Load the master manifest which has information about each rendition
- Find out which renditions are available and pick the best one (based on available bandwidth)
- Load the rendition manifest to find out where the segments are
- Load the segments and start playback
- After playback starts, that is when we get into adaptive bitrate streaming.
DASH
DASH employs the same strategy as HLS. One video file is broken up into small segments of different resolutions. The format of a DASH playlist file is in XML instead of plaintext like it is with HLS. The specifics of how the DASH manifest tells the player where to find each segment file is a little different. Instead of linking to each segment specifically, the DASH manifest supplies a "SegmentTemplate” value that tells the player how to calculate the specific link for each segment.
Whether using HLS or DASH, the biggest benefit that they both bring to the table is that manifest files and segments are delivered over standard HTTP. Having a streaming format that works over standard HTTP means that all of this content can be served over tried and true HTTP servers and it can be cached on existing CDN infrastructure. Moving all of this video content around is as simple as sending and receiving HTTP requests.
Adaptive Bitrate Streaming
For both HLS and DASH, since we are creating all these different renditions of our content, players can adapt to the different renditions in real-time on a segment-by-segment basis.
For example, in the beginning, the player might have a lot of bandwidth, so it starts streaming at the highest resolution available (1080p). Streaming is going smooth for the first 5 minutes. At the end of the first 5 minutes maybe the internet connection starts to suffer and now less bandwidth is available, so the player will degrade to 360p for as long as it needs to. Then, as more bandwidth becomes available again, the player will ratchet back up to higher resolutions.
All of this resolution switching is entirely up to the player. Using the right player can make a huge difference.
Let’s take a real-world example. You open up Netflix on your mobile device and decide to watch The Office for the 11th time in a row. After you scroll around and pick your favorite episode (Season 2 Episode 4) and hit play.
Now the player kicks into gear and you see a red spinner. What is going on behind the scenes while you see the red spinner is that the player is making an HTTP request to Netflix’s servers to determine what resolutions are available for this video. Next, the player will run a bandwidth estimation algorithm to get a sense of how strong your internet connection is. Right now, you are on a good wifi connection so the player will start playing at the highest rendition available for your screen size.
As you are watching this 23-minute episode of The Office the player is working hard in the background to keep up with your streaming. Let’s say you go for a walk and get off the WiFi and now you’re on a cellular network and you don’t have a strong signal. You may notice that at times the video gets a little blurry for a few minutes, then it recovers. Right before the video got blurry the player determined that there was not enough bandwidth available to keep streaming at a high rendition, so it has two options (1) Buffer, meaning pause the video and show a loading spinner and make you wait while it downloads more segments or (2) Degrade to a lower resolution so you can keep watching. A good player will pick number 2: it’s better to give you a lower resolution instead of making you wait.
The player’s goal is always to give you the highest rendition that it can, without making you wait.
MP4 & WebM
MP4 and WebM formats are what we would call pseudo-streaming or "progressive download”. These formats do not support adaptive bitrate streaming. If you have ever taken an HTML <video> element and added a "src” attribute that points directly to an mp4 than this is what you are doing. When linking directly to a file most players will progressively download the file. The good thing about progressive downloads is that you don’t have to wait for the player to download the entire file before you start watching. You can click play and start watching while the file is being downloaded in the background. Most players will also allow you to drag the playhead to specific places in the video timeline and the player will use byte-range requests to estimate which part of the file corresponds to the place in the video you are attempting to seek.
What makes MP4 and WebM playback problematic is the lack of adaptive bitrate support. Every user who watches your content must have enough bandwidth available to download the file faster than it can playback the file. When using these formats you constantly have to make a tradeoff between serving a high-resolution file that requires more bandwidth (and thus, locking out users with lower bandwidth) vs. serving a lower resolution file and requires less bandwidth (and thus, unnecessarily lower the quality for the high-bandwidth users). This becomes especially important as we are experiencing a shift as more and more users are streaming video from mobile devices on cellular connections. Cellular connections are notoriously inconsistent and flakey and the way to reliably stream to these devices is through formats that support adaptive bitrate streaming.
Players
There's nearly an infinite number of players on the market to choose from for HLS and DASH. Some are free and open-sourced, some are paid and require a proper license to use. Each player supports different features, for example, captions, DRM, ad injection, and thumbnail previews. When choosing a player you will need to make sure it supports the features you need and allows you to customize the UI elements enough for you to control the look and feel. These are all decisions you will need to make for web-based playback in the browsers, native app playback on iOS and Android or any other operating systems where your content will be streamed.
Delivery
For video delivery, the goal always remains the same: deliver the video segment as fast as possible to avoid buffering and ensure an uninterrupted viewing experience.
As we learned in the Playback section, any video player supporting adaptive bitrate (ABR) has the goal to provide the highest quality video without interruption. For this goal to be achieved, the system that stores the video content must deliver it as fast as possible.
Video content can include segmented delivery files such as TS segments (for older HLS delivery), MP4 fragments, or CMAF chunks for DASH and modern HLS. As for the system that’s responsible for delivering that content, there are two primary components: the origin server and the content delivery network (CDN).
As a video developer, the origin is your source of truth. It’s where you upload your original video files and where other system components like the CDN pull files from to help you deliver your video content faster.
You can deliver video content directly from your origin, but it’s not a good idea if your audience is large and dispersed. When this is the case, CDNs help you scale your service to distribute videos to many viewers with higher speed.
Below, we’ll talk about CDNs and other system components that are responsible for the smooth streaming experiences we’ve all come to expect.
Content Delivery Networks
Before diving into more technical details about CDNs and video streaming, let’s break the CDN concept down into a simple analogy.
A single video server (i.e. origin) responding to numerous requests from streaming devices in multiple regions is like a single cashier responding to numerous requests for purchases from customers in multiple service lines. Just like the cashier experiences stress, so does the video server. And when things come under stress they tend to slow down or shut down completely. The CDN prevents this from happening, especially for video content that is popular among a dispersed audience.

In more technical terms, a CDN is a system of interconnected servers located across the globe that uses geographical proximity as the main criteria for distributing cached content (e.g. segmented video files) to viewers. When a viewer requests content from their device (i.e. clicks a video play button), the request is routed to the closest server in the content delivery network.
If this is the first request for the video segment to that CDN server, the server will forward the request to the origin server where the original file is stored. The origin will respond to the CDN server with the requested file, and, in addition to delivering the file to the viewer, the CDN server will cache (i.e. store) a copy of that file locally. Now, when future viewers request the same file, the origin server is bypassed and the video is served immediately from the local CDN server.
Considering that the internet is mostly made up of fiber buried underground and underwater, it makes sense why the location of video servers is important. For example, a viewer in Asia wanting to stream content from an origin server based in the United States will experience poor loading times as this request has to travel across oceans and continents. But with a CDN, the video is almost always delivered from a CDN server in Asia. These locations that store cached video content are known as points of presence (PoPs).
The business case for improving the viewer experience with CDNs should make sense at this point. By getting video from a local cache, viewers don’t have to wait more than a couple hundred milliseconds for a video they want to watch to start playing. This amount of response time is virtually unnoticeable and creates an experience that incentivizes viewers to stay on the platform where the video is playing.
As for the business case from a cost perspective, delivering video with CDNs significantly reduces bandwidth costs because content doesn’t have to travel as far. Delivering content from local caches requires less stress on networks, and lower costs related to data transmission efficiency are passed on to the video provider. Imagine all the network overhead if requests from all over the world were being served from a single server!
Another business case deals with uptime and reliability. CDNs have traffic capacity that exceeds most normal enterprise network capabilities. Where a self-hosted video may be unavailable due to unexpected traffic peaks, CDNs are more distributed and remain stable during peak traffic instances. For this reason content delivery networks are also referred to as content distribution networks.
How Video Content Travels
When talking about how content travels (and how the Internet works) it’s common to use the terms first mile, middle mile, and last mile.
First mile: When content travels from the origin to the CDN. For example, video content located on an origin server like Amazon S3 is sent to a CDN like StackPath when it’s requested for the first time by a viewer. This content travels from the origin to the CDN using the Internet backbone as a highway. This backbone is composed of various networks owned by different companies that link up using an agreement called peering.
Middle mile: When content travels from the CDN to the ISP. After the video content is cached in the CDN, it can directly connect to Internet Service Providers (ISPs) that the viewer uses to connect to the Internet with. This direct connection to tier-1 network carriers like Verizon and Comcast allows the CDN to provide enterprise-grade performance and route traffic around network congestion and weather-caused outages that’s common in the public Internet.
Last mile: When content travels from the ISP to the end user. At this point, the video content is traveling through buried fiber, telephone lines, or cellular towers to make it to the viewer’s device.
As for how these various pieces of the Internet communicate, the most common language is the HTTP protocol. This is defined as a stateless protocol under the GET method, meaning that the content does not change when it travels.
With this in mind, a CDN that had dozens or even hundreds of locations does not need the servers in those locations to communicate with one another to make sure it has the right video content. As long as each server fetches the video content from the origin, every viewer will receive the same video, regardless of their location in the world.
Multi-CDN
In a multi-CDN environment, the goal is to distribute load among two or more CDNs. Multi-CDN enables you to direct user requests to the optimal CDN according to your business needs.
In the following figure, there are three CDN providers A, B, and C. CDN provider A is providing an excellent service for users 1 and 2, but CDN provider C offers a better experience for user 3. In a multi-CDN environment, requests by users 1 and 2 can be directed to CDN A and requests by user 3 can be directed to CDN C.
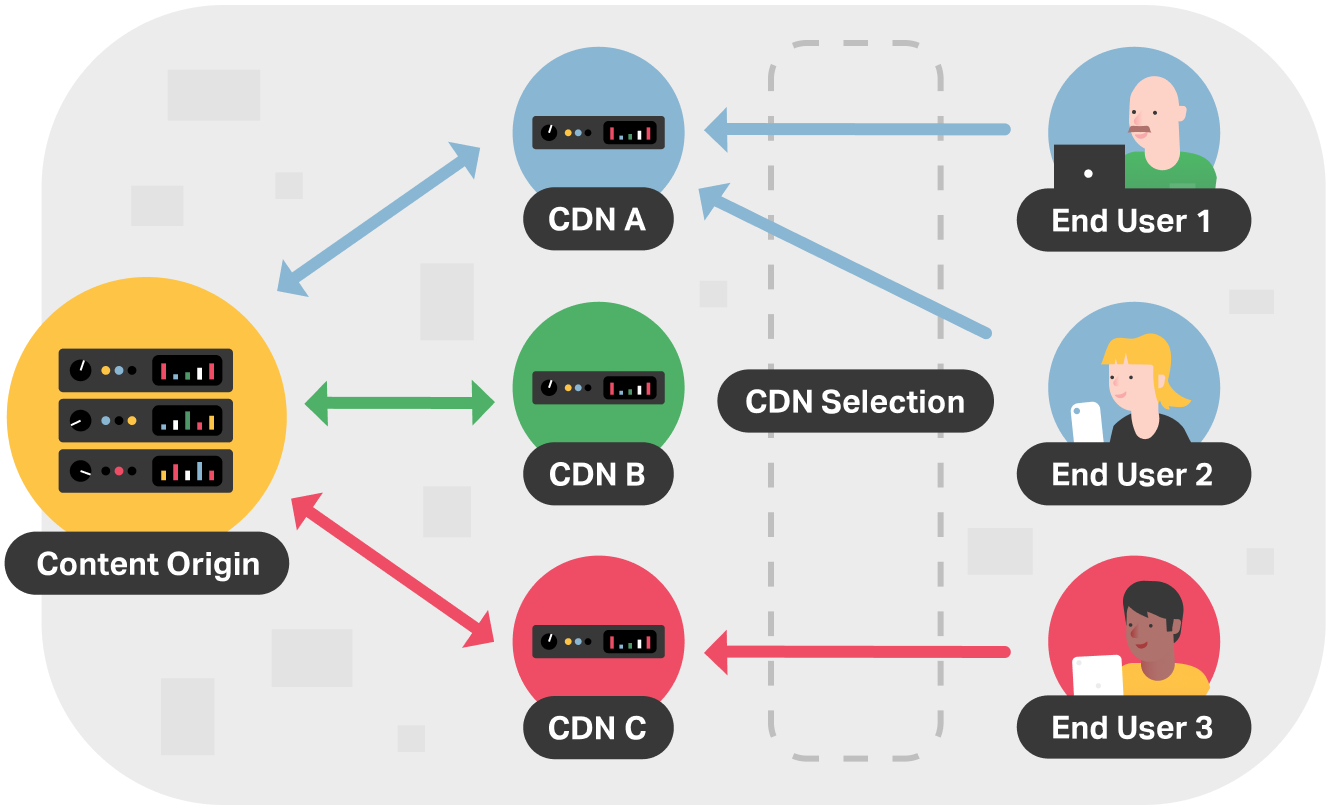
Depending on the technique, selecting an optimal CDN could be based on a number of criteria: availability, geographic location, traffic type, capacity, cost, performance, or combinations of the above. Services like NS1 make this type of routing possible.
Multi-CDN is something Mux uses itself. For example, in June 2019, Verizon made an erroneous routing announcement update which channeled a major chunk of Internet traffic through a small ISP in Pennsylvania. This led to significant network congestion and degraded performance for some of the large CDNs in its multi-CDN setup. By using CDN switching, Mux was able to divert most video traffic to StackPath’s CDN and continue to deliver optimal viewing performance during the outage.
Using various content delivery networks, Mux is driving HTTP Live Streaming (HLS) latency down to the lowest levels possible levels, and partnering with the best services at every mile of delivery is crucial in supporting this continued goal.
Processing
Before you can binge watch The Office or Friends over the internet, the media files that were shot and edited into "video" have to go through a major transformation. This post is about the different types of processing that need to occur after a film is shot but before it can be watched online.
However, preliminary to the dive into the media processing explanation, it might be necessary to quickly review the very basic building blocks of digital video and audio, so that the rest of the information will be easier to understand for those starting to learn about media streaming.
Foundational concepts
Video
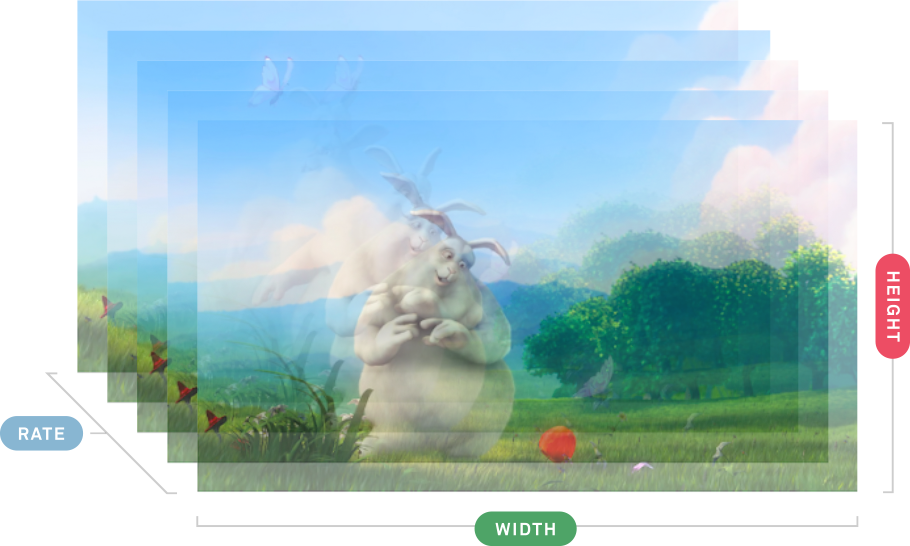
When the eyeballs see a sequence of changing images, the brain creates the illusion of movement. It's partially the way that the human visual system works. The fundamental concept of a video exploits this particularity. A video can be perceived as a series of pictures being shown, one after the other, at a given pace.

Audio
A harder concept to visualize is sound, which is the vibration that propagates as a wave of pressure, through the air or any other transmission medium, such as a gas, liquid, or solid. The human brain perceives these waves and produces what we understand as sound.

Digital video
To materialize the idea of a digital video file, one might think of grouping a list of ordered digital pictures captured at a given frequency, let's say 30 per second. Later, when the content will be played, a given device could display all the pictures in sequence, each one in a 33 ms interval (1000 ms / 30 fps), and thus we'll perceive it as a movie.
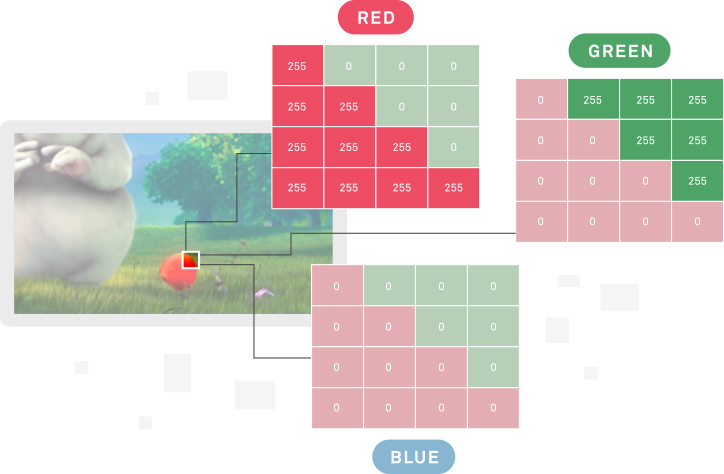
Each frame is created by an arrangement of little "dots" known as pixels, and each one of them holds color information that can be represented by using the primary colors RGB. An easy way to think about it is to visualize a picture as three matrices of numbers, one for each color of RGB. The different colors are obtained by mixing the red, green and blue colors.
Digital audio
For the audio file creation, one needs to somehow find a way to convert the waves into discrete numbers. In the end, that's what a computer can store. We could "sample the waves regularly at uniform intervals, and each sample is quantized to the nearest value within a range of digital steps." Wikipedia
Putting into another perspective, let's say we describe the waves by using 48000 points per second (48Khz), and for each point will use a 2 bytes long number to represent its value. Later we can recreate the physical wave of pressure with minimal loss by reading the data associated with its properties, 48Khz and 16 bits each point.
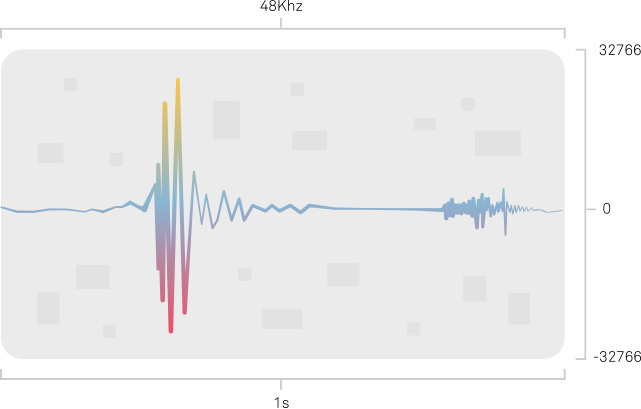
Audacity is an open-source tool aiming to do audio editing but it also has a way to visualize the sound waves for a given audio file. Did you know it's possible to generate audio from a sound wave image graphic?
Codec
The previous explanation about digital media poses a serious problem. The generated files are huge in terms of storage. Let's see the numbers in detail. Five seconds of raw 5.1 audio: 6 channels, 48khz, 16 bits uses circa 2.8MB.
6 channels * 48000 hz * 5s * 2 bytes = 2.8MB
The same five seconds of raw video: 1920 x 1080, 24 bits (8 bit R, 8 bits G, and 8 bits for B) per pixel, 60 frames per second will require about 1.7GB of storage.
1920 * 1080 * 3 bytes * 5s * 60 fps = 1.7GB
The amount of bytes needed for merely 5 seconds of media is unacceptable. Such a big size would require a tremendous bandwidth to watch. To overcome this problem, we compress the media using codecs. A codec is a hardware or software capable of significantly reducing the required memory for a media.
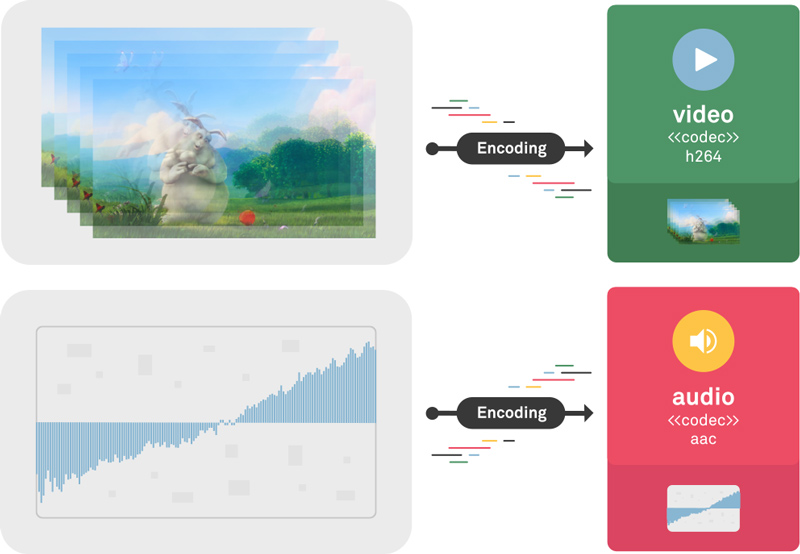
Encoding
The process of taking an uncompressed media file (usually referred to as “raw”) and converting it to a compressed one is known as encoding. By the way, this is usually the first processing step that the media is submitted to. Let's see how much a codec can compress the audio and video stream.
| Type | Uncompressed size (raw) | Compressed size (encoded) |
|---|---|---|
| audio | 2.8M | 243K (0.243M) |
| video | 1.7GB | 2.0MB (0.002GB) |
As we can see, the introduction of a codec reduces the file size about 11 times for the audio and 850 times for the video, making streaming media a sustainable business.
There is no free lunch
The almost miraculously encoding process takes advantage of how our vision works. The codecs usually exploit the temporal and spatial repetition to reduce bits. However it also discards information through a task known as quantization, meaning that there is a loss of quality after the encoding. The codec strength lies in dropping the bits that don't matter much for our view.
This compression ratio also introduces an explicit requirement. The device where the video will play must know how to decode the compressed media, which means that the playback system must have a codec (at the least the decoder part) installed into it.
FFmpeg
From now on, we'll use a program called FFmpeg to illustrate and prove many of the ideas discussed here in a practical way. For instance, how can we be sure that the previous calculations are right? For this task, we can use FFmpeg to compare the compressed vs uncompressed files.
FFmpeg is arguably the most ubiquitous open source media program available. It's a complete solution to read, change, and write back media files.
The command line has a general syntax that looks like
ffmpeg {1} {2} -i {3} {4} {5}, where:
- global options
- input file options
- input url
- output file options
- output url
Learn more about the FFmpeg command line.
-
Download a sample file for testing, for this task I took the big buck bunny 1080p 60fps video file at https://peach.blender.org/
-
Run the following commands on your terminal.
ffmpeg -i bunny_1080p_60fps.mp4 -ss 00:01:24 -t 00:00:05 compressed_h264.mp4This command uses the bunny video as the input (
-i), it seeks (-ss) to the time 00:01:24, and then takes (-t) 5s generating an output video. -
ffmpeg -i compressed_h264.mp4 -c copy -vn compressed_aac.aacThis command uses the compressed bunny, it copies (
-c copy) the streams but it skips the video streams (-vn), effectively generating an audio only file. -
ffmpeg -i compressed_h264.mp4 -c copy -an compressed_h264.h264This command does almost the same as the previous command but it skips the audio (
-an) generating a video only file. -
ffmpeg -i compressed_h264.mp4 -f s16le -acodec pcm_s16le raw_6ch_s16b_48khz_audio.rawThis command takes the same input as before but now it changes its format to an uncompressed audio only using (
-f s16le) a signed 16 bits generating a pcm audio (-acodec pcm_s16le). -
ffmpeg -i compressed_h264.mp4 -c:v rawvideo -pix_fmt yuv444p raw_1920p_60fps_444p_video.yuvFinally we're creating a raw (
-c:v rawvideo) video using a pixel format (yuv444p) that offers zero compression.
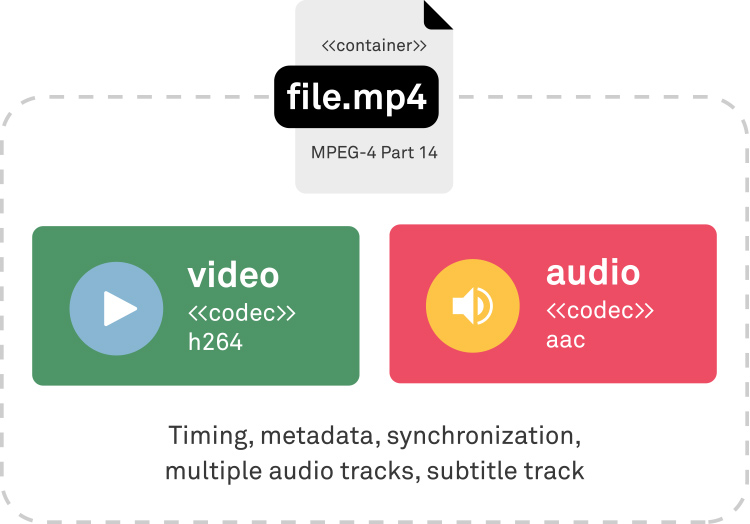
Containers
Once we have the compressed individual streams of audio and video, we wrap them into a file known as the container. A container provides a way to interleave different media data types, such as video, audio, subtitles, etc.
Besides that, it also supplies a timing model, synchronization, metadata, and other data that will help a device to play the media properly, like audio and video in sync. It's good to note that all these extra features bring some expected overhead.
When you read the given definition of a container you might have a false feeling that a container can carry any kind of media data types (codecs) combination, right?! But that's not the case at all.
For reasons such as: patents, availability, outdated devices, underpowered devices, device specifics, and transport medium specifics, a plethora of containers coexist and they offer a constrained support for codecs and general features.
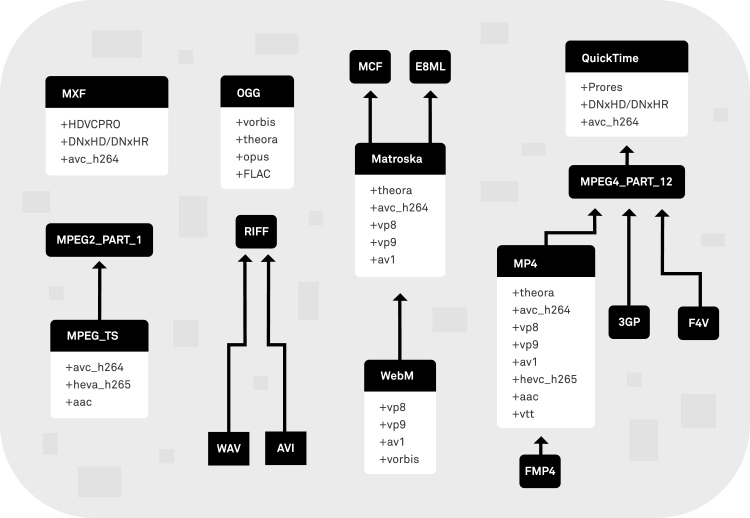
There are many containers available, some of them are exclusive for audio, i.e. WAV, but the majority can hold both audio and video streams. You may recognize some of them like MPEG-4 PART 14, Matroska, MPEG transport stream mostly by their file extensions MP4, MKV, TS in order.
The confusing world of containers
Below is a graph showing some containers and their capabilities. The arrows aren't always an indication of direct heritage. They indicate only that a given container was inspired/followed/improved over the other part.
Media processing
Now that we know many of the primary foundations of digital media. We can proceed with the discussion about the transformations that video and audio can go through.
Most of the time, we change media components to improve their compatibility. For instance, some devices won't play a given codec due to patent issues; others can't handle high-resolution videos due to their limited processing power. In the end, some factors force us to modify digital media to increase its reach.
We also process media to do lots of improvements, for instance, we can validate a media doing volume loudness checking, augment its metadata to find what actress is working on a given tv show, and so on.
Here we're going to discuss some of the main processing tasks, describe them, understand the logic behind them, and put them to practice.
Common language
When you read or watch content about digital media, you're going to see people using lots of acronyms and giving different nouns for the same idea. You might see ABR meaning adaptive bitrate, but it sometimes will be used for average bitrate.
We're going to adopt the language and workflow used in FFmpeg's internal architecture to unify the terms and avoid further confusion. FFmpeg organizes its components into required phases to provoke any change to a media file.
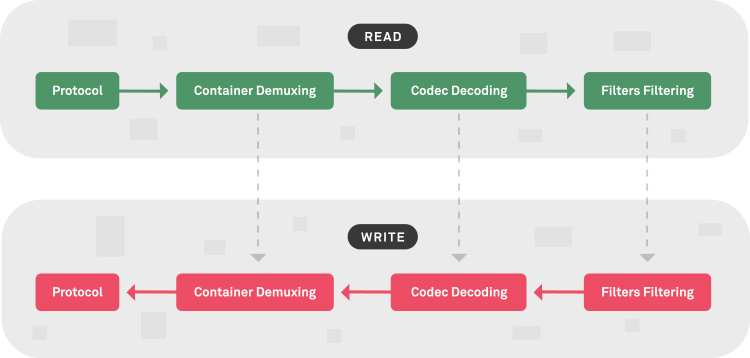
Whether you're reading or writing a media you:
- start by reading/writing it through/to a protocol (e.g. file, udp, rtmp, http, etc),
- and then you can read/write (demux/mux) the container (e.g. mp4, webm, mkv, ts, etc),
- from here you can read/write (decode/encode) the codecs, the container usually contains audio and video, you may have to do this step multiple times (e.g. h264, av1, aac, etc),
- finally exposing their raw format (e.g. rgb, yuv 420, pcm, etc ) for the filtering phase, where a lot of cool processing can be done.
If you only need to modify the container, you can skip the other steps. Assuming that you want to work with the raw frame, you must go through all the phases. Another compelling aspect of this architecture is that it treats audio and video likewise.
Transcoding
What?
Transcoding is the process of converting a media from codec A to B, but we'll also treat the terms encoding (from raw to compressed) and re-encoding (encoding to the same codec changing its properties) as if they were the same process.
Some of the current most important codecs are h264 (avc), vp9, h265 (hevc), av1, aac, opus, Vorbis, and ac3.
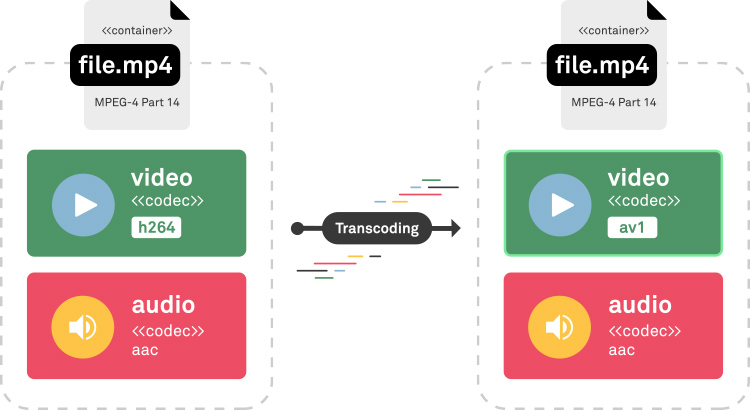
An example of a media being transcoded from H264 to AV1.
Why?
The codec conversion is mostly necessary due to:
- compatibility: outdated hardware or software, some devices might require specific codecs
- economics: avoid patent costs, saving on storage and bandwidth
- enhancements: better compression ratio, higher resolutions, better framerate, new features (such as HDR, 3D sound)
How?
This FFmpeg command takes an input (-i) and converts its video codec (-c:v) to av1 (using the libaom-av1 library) and don't worry if you don't understand all the options here. The idea is to transcode a video from h264 to av1.
ffmpeg -i compressed_h264.mp4 -c:v libaom-av1 -crf 30 -b:v 2000k -cpu-used 8 -row-mt 1 compressed_av1.mp4
Transcoding is an expensive operation in terms of video duration versus time to transcode. On a 2018 Mac (i5, 8GB), it took about 2 minutes to transcode 5 seconds of video.

Transrating
What?
Transrating is the process of changing the bitrate (amount of bytes required per unit of time) of a media, aiming to shrink its file size. Mostly three aspects guide this transformation: quality, speed, and space.
Quality is the measure of how good the final media looks to our visual judgment, speed is about time to do the process utilizing the CPU/GPU, and space is the required volume of memory by the media.
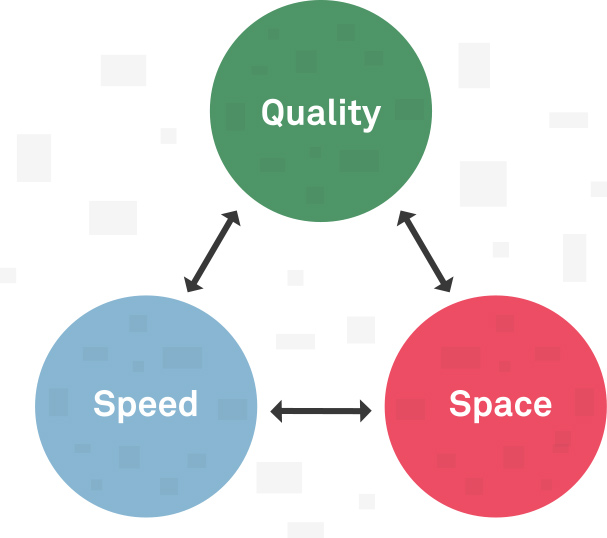
We usually need to favor two of these features at a given time. It means that if we want quality media and fewer bytes, we'll need to give it more CPU time. Frequently what we do is partially compromise some of these features based on context.
Why?
The change of bitrate is mostly necessary due to:
- compatibility: works on devices where the network quality is poor or low bandwidth
- economics: saving on storage and bandwidth
How?
To change the bitrate we first need to select a proper rate control. The rate control manages how the encoder spends the bits during the compression phase.
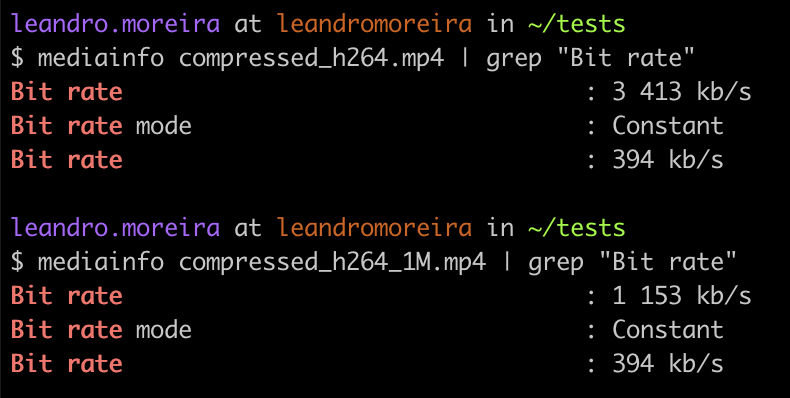
The following FFmpeg command takes an input (-i), keeps the audio untouched (-c:a copy), but it changes the video bitrate, suggesting a peak value (-maxrate) and maintaining the quality (-crf) up to a certain level. For h264, the crf ranges from 0 to 51, where 23 is a good middle value.
ffmpeg -i compressed_h264.mp4 -c:a copy -c:v libx264 -crf 23 -maxrate 1M -bufsize 2M compressed_h264_1M.mp4
As you can observe, we changed the bit rate from 3.4Mb/s to 1.1Mb/s.
Transsizing
What?
Transsizing is the act of changing the resolution of a media, scaling up or down. For instance, one can create a lower resolution version from a higher resolution video.

Why?
The change of resolution is mostly necessary due to:
- compatibility: works on devices where the network quality is poor or low bandwidth, a small resolution requires less data, older devices might not be able to handle high-resolution version of a given media
- economics: saving on storage and bandwidth
How?
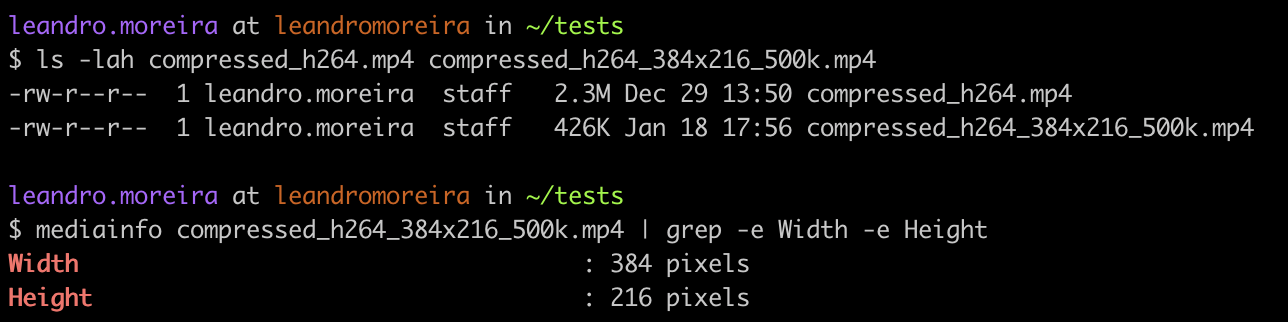
To change the resolution, we need to re-encode the media. The activity of modifying the resolution is also known as upscaling when you're converting a smaller video to a bigger one, and downscaling on the contrary.
The following FFmpeg command takes an input (-i), keeps the audio untouched (-c:a copy), changes the video bitrate, and also changes the resolution keeping the aspect of the video (-vf scale=384:-1).
ffmpeg -i compressed_h264.mp4 -c:a copy -c:v libx264 -crf 23 -maxrate 500k -bufsize 1M -vf scale=384:-1 compressed_h264_384x216_500k.mp4
We scaled down our media to 216p, and its size also went down significantly from 2.3MB to 0.4MB.
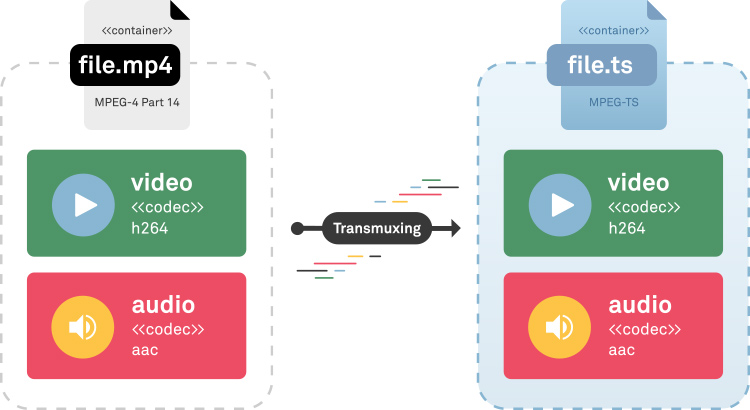
Transmuxing
What?
Transmuxing is the process of altering a media format container. For instance, one can change an mp4 file to MPEG-ts keeping the audio and video streams intact.
Why?
The container conversion is mostly necessary due to:
- compatibility: outdated hardware or software, some devices might require a specific container
- economics: avoid patent costs, saving on storage and bandwidth
How?
Transmuxing is a very cheap operation, compared to the main processing tasks. The following FFmpeg command takes an input (-i), keeps the audio and video untouched (-c copy), and it only changes the container hinting its desired container by the output extension.
ffmpeg -i compressed_h264.mp4 -c copy compressed_h264.ts
We can notice that there was a small increase in size coming from an mp4 file to a MPEG-ts one.

Packaging
What?
A modern player must know how to deal with different hardware and context situations while playing the media content. A part of these devices are underpowered, therefore can't handle complex video or audio related tasks. Sometimes the network bandwidth will vary thus making the user wait for the content to be downloaded.
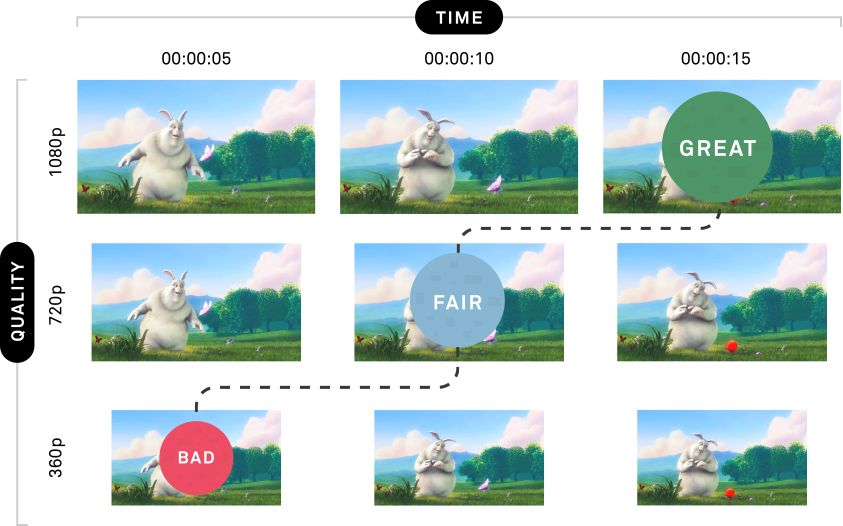
To overcome these issues, the streaming industry created what we call adaptive bitrate streaming. The idea behind this is to segment a whole media file into two distinct dimensions: time and resolution. You take an hour-long video and splice it into several X seconds segments, and you also create multiple resolutions (e.g. 256x144, 640x360, 1280x720, etc), also known as renditions.
When the device is not able to handle a media, due to its current context, it can dynamically adapt. For instance, while the network is facing a hard time to download a high resolution content, the player can pick a lower resolution of a video.
But now we have another problem, how will the player acknowledge this protocol? How many renditions do we own? or how many segments does the media have? To answer these questions a text file format is introduced, known as a manifest, which contains all the information for the player to make decisions.
The whole process of creating multiple renditions, segmenting media by time, and creating a manifest describing this scheme is known as packaging. There are two major packaging formats known, HLS which was created by Apple and MPEG-dash created by MPEG.
Why?
The packaging format is mostly necessary due to:
- compatibility: outdated hardware or software, some devices might require specific packaging format
- economics: avoid patent costs, use known scalable/cacheable HTTP servers solution to distribute the content
- enhancements: adaptive smooth playback even when the network is fluctuating or the device is doing lots of processing
How?
One way to understand how packaging works is by doing it by hand, we're going to take an mp4 file and generate multiple renditions, an m3u8 manifest, and lots of MPEG-ts segments.
Architectural trivia: FFmpeg seemed to start treating HLS as a protocol but later they changed to handle it as a container in its workflow.
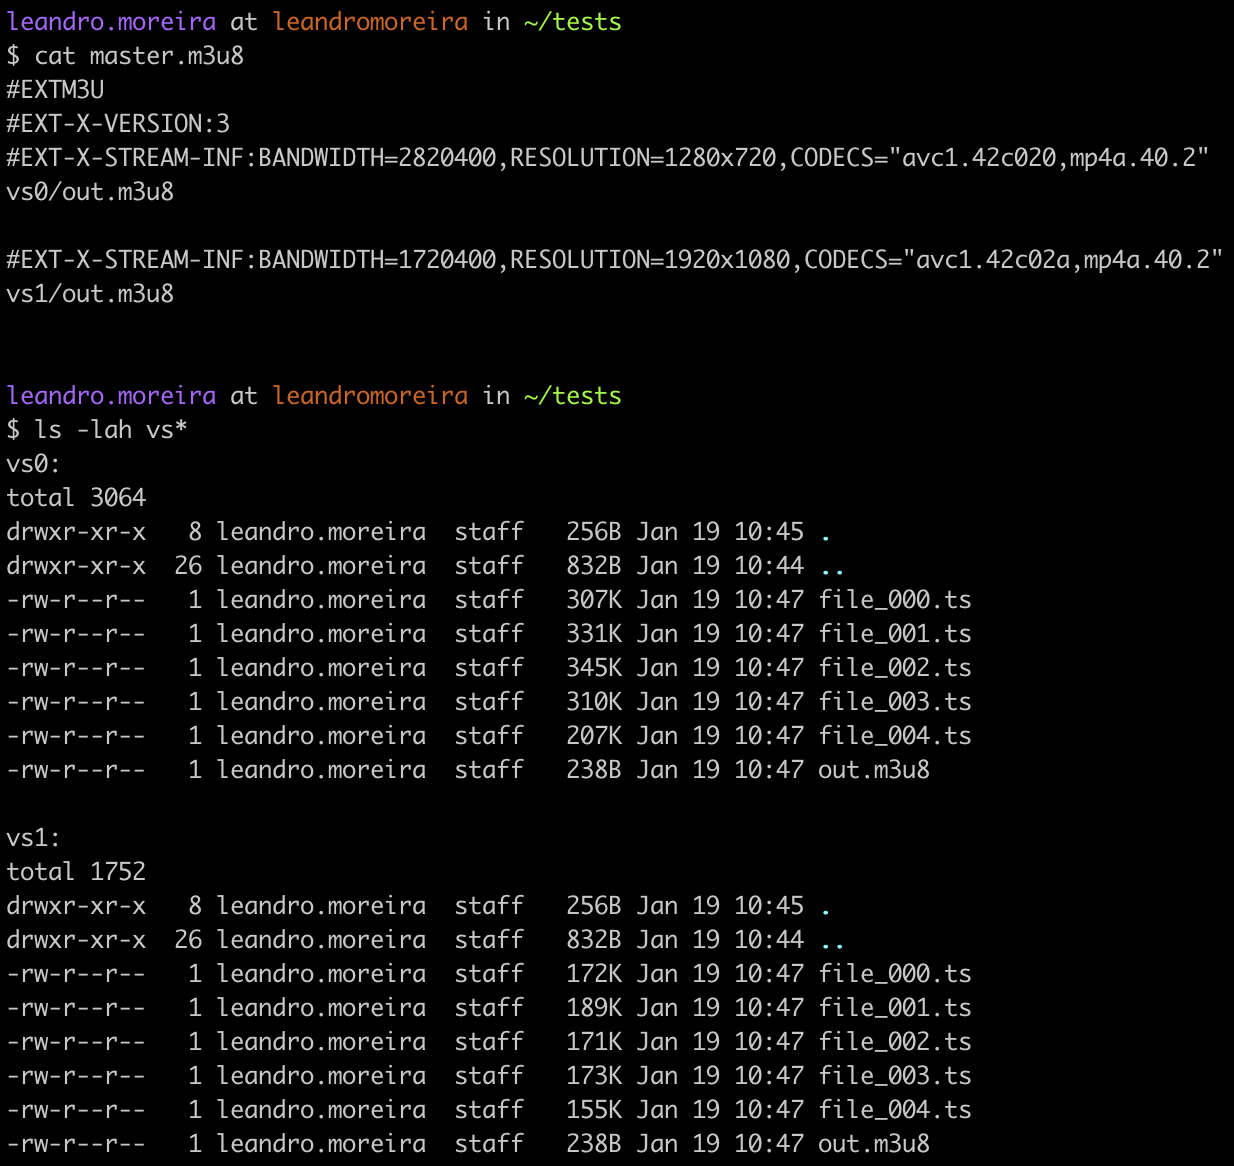
The following large FFmpeg command takes an input, re-encode it into two videos, one for 1080p and other for the 720p rendition. Both videos will include the same audio track. We then instruct FFmpeg to segment the video into files of 1s (-hls-time 1) and create a manifest named master.m3u8.
ffmpeg -hide_banner \
  -i compressed_h264.mp4 \
  -c:v libx264 -preset ultrafast -tune zerolatency -profile:v high \
  -b:v:0 2500k -bufsize 5m -x264opts keyint=60:min-keyint=60:scenecut=-1 \
  -b:v:1 1500k -s:v:0 1280:720 \
  -bufsize 3m -x264opts keyint=60:min-keyint=60:scenecut=-1 \
  -map 0:v:0 -map 0:v:0 \
  -c:a libfdk_aac -profile:a aac_low -b:a 64k \
  -map 0:a:0 \
  -f hls -hls_time 1 -var_stream_map "v:0,a:0 v:1,a:0" \
  -master_pl_name master.m3u8 \
  -hls_segment_filename 'vs%v/file_%03d.ts' vs%v/out.m3u8
You can see the manifests and segments created by the FFmpeg packaging process.
Going beyond processing
Up until now, we discussed essentially the necessary tasks over the media to make it available for the majority of users, however other types of processing will offer analytical, monitoring, or even expand the common user experience.
Monitoring
You can do some kind of processing over the raw frames to detect black or muted scenes, denormalized audio, etc. The idea is to constantly check if the media output is conforming to some kind of expected behavior that we look for.
You can use a filter on FFmpeg called blackdetect to find out if your media has a black video of d duration. Noticed that some chapter transition inserts intentionally black video.
ffmpeg -i media.mp4 -vf blackdetect=d=1 -f null

You could also use the silencedetect filter to discover where there's a silence of a d duration.
ffmpeg -i media.mp4 -af silencedetect=d=2 -f null -
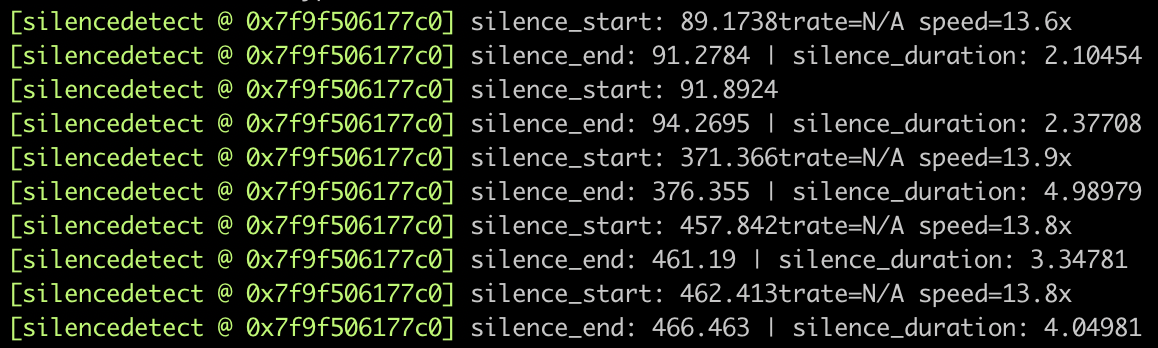
This kind of processing can happen before or after the media was processed, and it tries to point out possible issues that can be automatically checked by a computer.
Analytical
When we're defining the multiple renditions and bitrates for media packaging, we need to specify the values we desire. We could prescribe a set of fixed resolutions and bitrates for all content, but a soccer game differs a lot from an anime in terms of bytes required. A soccer match has more movements and details while an anime has fewer characteristics and consistently fewer colors.
One solution to this dilemma is to create the encoding parameters testing values and putting real people to evaluate the visual quality per bitrate values. Once we have these grades, we can pick the most adequate (the best quality storage ratio) bitrate for a given title.
But such a task requires lots of time and people. Alternatively, there are some tools like VMAF where we can check, given two videos, what's the quality difference between them. Now, we can do the same method to find the best effective bitrate and quality parameters, but using an automated tool.
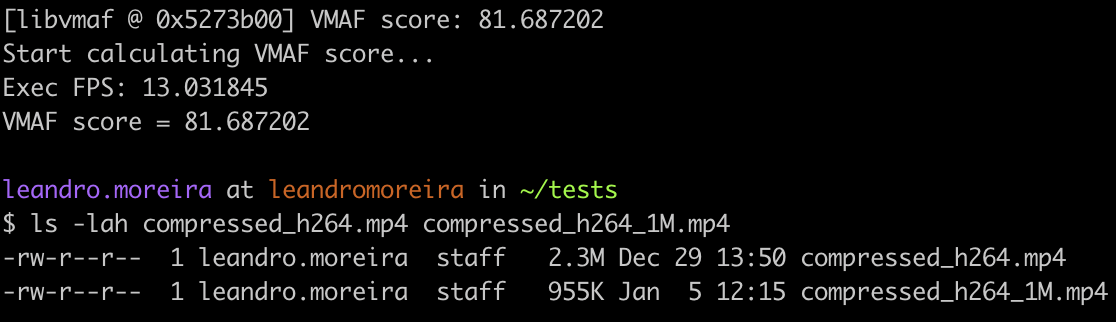
This FFmpeg command line compares two videos using VMAF and shows a score that ranges from 0 to 100, where 100 means identical videos.
ffmpeg -i compressed_h264.mp4 -i compressed_h264_1M.mp4 \
  -lavfi libvmaf=log_fmt=json -f null -
A possible usage would be to understand how much quality we lose with a transrating operation. Comparing our initial 3.4Mb/s bitrate with a 1Mb/s version of it, we got an 81 VMAF score. We could set a cutoff and try different encoding parameters to achieve the best ratio quality vs storage.
Enhancements
We can also augment the user experience by extracting data from the media that can be obtained after some kind of processing, things like:
- automatically converting speech to closed caption
- creating thumbnails facilitating the scene navigation on the player
- scaling up videos to super resolution using AI
- enriching metadata by identifying characters, objects, time, places, etc.
- finding the intro/credits pattern so we can add cue point data to the media, enabling the users to skip the intro/credits
- selecting good places in the timeline to insert ads that aren't so obtuse, like a long scene change, long black transition, etc.
The opportunities are endless and with the ML/AI landscape being more explored, people are getting more and more creative about what we can do with media.
Conclusion
In a real-world media processing deployment, a lot of video processing happens in a pipeline. The media is ingested, validated, transcoded, packaged, hosted and finally played. Most of these processing steps are mandatory to make the streaming available for the final users.
Beyond the operations we do to improve the compatibility, there are far more complex tasks we perform to improve the user experience or even to increase profits. Processing digital media demands time and hardware, and we need to balance what's worth the time and money.
We’re only just scratching the surface of digital media processing, but I hope this post helps you to start on this exciting journey.